This easy-to-make, must-have-staple will be used frequently when you commit yourself to a dairy-free lifestyle. I seriously, do not miss real whipping cream any longer. The benefits of Coconut Milk are numerous, the MCFA’s (medium chain fatty acids) are wonderous and do not increase inflammation in the body like dairy does! I have a couple tricks up my sleeve that have made this process a little easier than when I started. So, please whip it up and enjoy!!
Please follow and like us:
Print Recipe
Coconut Whipping Cream
Creamy Delicious Coconut Whipping Cream to be used with anything...
Pancakes? Waffles? Coffee? Tea? Fruit? Eat it straight out of the bowl?
YEEEEEEESSSSS!!!!
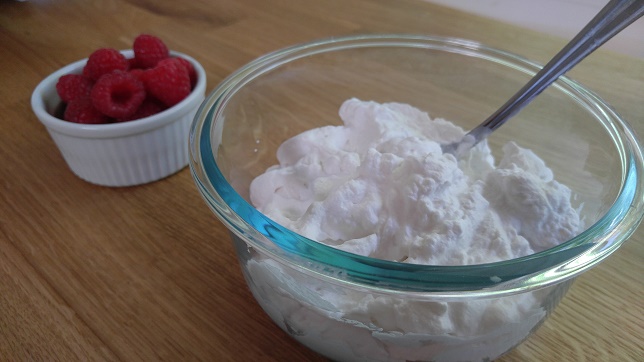
Empty contents of Coconut Cream into your 'frozen' bowl
Add in Vanilla and Maple Syrup
Whip, Whip it good! For at least minutes until you have stiff frothy peaks!
Serve and enjoy...or just pick up a spoon and go for it!!
Recipe Notes
The key to success in this recipe is all in the preparation.
I have tried almost all coconut milks out there and have found Trader Joe's Coconut Cream to be the best option with the best turn out and least waste.
Also, the longer you refrigderate...the better. Many sites will say 24 hours, but really I find again that anything after 48 is best. Also, if you are in a pinch and forgot to do this ahead of time, you can always throw in the freezer for 20-25 minutes. Just want to make sure contents have thoroughly cooled (not froze) before whipping.
Lastly, this trick has been handed down to me by my mama. Before you whip your cream, freeze a metal bowl for about 20-30 minutes. This will ensure that your cream stays cool while you whip the crap out of it!
So, it is the middle of summer and my family and I are craving all things Fall. Why, you ask? No idea…
Maybe since moving to Southern California from Minnesota, we miss the seasons. I have been told we have 4 seasons in So Cal, but I have yet to see them…at least not in the drastic manner in which we were used to back in Minnesota.
Pies, crumbles,crisps, mulled spices, anything pumpkin or apple consumes our thoughts and I did the only thing I could think of that is fast. Peach and Pear Crisp. I haven’t set out to make this grain free yet, and I will! But this worked in a pinch! And in the healthiest manner possible!
Please follow and like us:
Print Recipe
Gluten Free Peach & Pear Crisp
Easy, fast and delicious! Satisfying Fall cravings even in the middle of summer!
1/8cupsugarraw cane sugar, coconut sugar or date sugar is best
Instructions
Preheat oven to 325 °
Mix cinnamon, cloves, sugar, salt, and arrowroot flour together and set aside
Drain Juices from jars of peaches and pears
chop up entire jar of peaches, chop 1/2 jar of pears
stir together and add in dry mixture, fold in lightly until all mixture is incorporated
Distribute evenly in small ramekins (I prefer small ceramic ones)
Top with granola
Distribute butter between ramekins on top of granola
Place ramekins on baking dish(this prevents spillage in oven!)
Bake for 40 minutes
Remove, let cool for 10-15 minutes
Top with Coconut Whipping cream and enjoy!
(see link below for recipe)
Recipe Notes
If you cannot use the brands that I have listed above, it is NOT a deal breaker. These are just the best possible and healthiest versions that I have found through all of my years of research and testing. With regards to canned anything...avoid corn syrup whenever possible. And your sugars should be the least refined if possible. Most of all, use your common sense. If it has too many ingredients and ones you do not recognize as FOOD, avoid it.
Granola won't brown and therefore cannot be used as an indicator of done-ness. Instead, look for bubbling along sides of ramekin.
Coconut Whipping Cream is optional and recipe can be found here